Upcycled Herringbone Nightstand #FBF
- Karly and JP

- Jul 24, 2020
- 5 min read
Happy flash back Friday! We're going to be guiding you step-by-step on how we refurbished an old nightstand to give it a contemporary look. Oh, and we did it for really cheap! Because we used a piece of existing furniture and we had most of the materials, I think our total expenses ran us about $10.
Last summer we decided to move our toddler into a new room as we prepared to welcome our second child. I was excited to finally give our third bedroom a purpose. Previously, it was kind of catch-all room. It went from music room, to guest room (endearingly referred to as our guest artist room because JP's drum set and my keyboard were still in there), then finally it was becoming a real bedroom.
This was my opportunity to give it some personality. We picked a woodlands theme inspired by our favorite crib sheet that would also find its way onto the toddler bed. With this in mind, we wanted to create a natural feel to the room with the furniture. We finished a dresser that belonged to JP's grandfather, we chose a very light gray for the walls and one navy wall as an accent, we put our rustic sideboard in the room to be used as a home for toys, and built book shelves. The only thing missing was a nightstand. Since our son was moving into a bed, we knew we wanted a place for tissues, a light, etc. Instead of buying something new, we figured we'd upcycle an old one that was already used as the guest room nightstand and give it the face lift (literally) that it needed.

The nightstand we used was part of a bedroom set that my parents bought together after they got married in 1979. So it was old. It had been painted several times over the years, but overall held up really nicely over 40 years. And since we are never ones to turn down hand-me-down furniture, we were happy to have it and update it!
I don't have a picture of what the original nightstand looked like, but here's what it looked like before we transformed it.

Things you'll need for this project: Materials - A piece of furniture. We obviously used an old nightstand, but you could use anything with drawers, really. - 3 1"x2" 8' boards These measurements are based off of the size of our project. You may need more or less wood depending on the piece you're redoing. We got lucky and had left over flooring in our crawl space when we moved into our home. We thought it'd be a nice way to take part of our home with us whenever we move to a different house, and (perhaps more importantly) it was free! - Wood glue. We use Titebond II, but any brand will work.
- 1/4" ply wood. This will act as the plate for the face of the drawer. The amount needed will be based on your project size. We used scrap ply wood that we already had.
- Sandpaper (80, 120, 180, 220 grit if you're stripping paint)
- Stain/finish
- Screws Tools - Circular saw
- Clamps - Random orbit sander. You probably could do this by hand, but depending on the amount of sanding required, I would recommend the ROS.
- Drill
- Measuring tape - Hammer (optional) - Pry bar (optional) - Speed square
This project was pretty straight forward, so let's dig right in! Step 1: Prepare furniture for sanding. Remove any drawers or doors, and any exterior hardware. Our nightstand didn't have any hardware to remove, but yours may.
Step 2: Sand. Then sand some more. Start with the lowest grit and work your way up to the highest grit to get a smooth, clean surface. Be careful not to spend too much time in one place to avoid sanding through any veneer.

Step 3: Remove any face framing/textured details. You may skip this step if you are starting with a flat surface. For us, the nightstand had framing that functioned as a drawer handle (and decoration?) that we needed to remove in order to get to the flat backing of the face board. We used a hammer and pry bar for this.


Step 4: Cut plywood to size. Using your circular saw, cut the plywood to the full size of the opening. The nightstand had two drawers, so we needed it to match the dimensions of both drawers. This is important to create the continuous herringbone effect.
Step 5: Measure and cut the approximate length of your boards. These will make up the herringbone pattern. Don't worry about being exact. You'll want to leave a little extra length, which will be cut off later.
Step 6: Create the herringbone pattern. Using the wood glue and speed square, set the center of the first board to the center of the plywood at a 45 degree angle. Set the second board flush lengthwise with the end of the first board. It should be perpendicular to the first board. Once you've got the angle you want, use wood glue to glue each board in place. Repeat the pattern until the plywood is covered. Be sure to clamp the boards as you go to give the glue a few moments to stick before clamping the next board. This is the same process we used for our herringbone table.
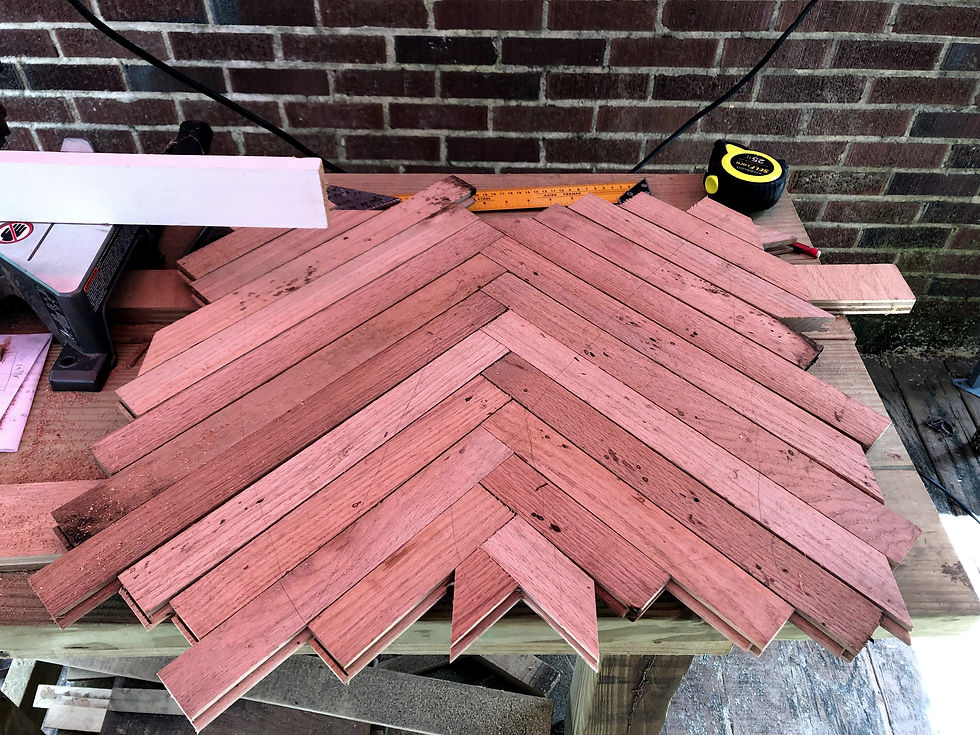
Step 7: Prepare the herringbone for drying. Place heavy objects on the top of the herringbone to keep the pattern tight and in place while it dries. This can be anything heavy. Anything at all. Allow the pattern to set for no less than one hour.
Step 8: Trim the excess. Flip the newly dried face upside down and use the plywood backing as a guide to trim the excess boards around the edges with your circular saw. Step 9: This is the most important step to get the continuous pattern. With the herringbone pattern still face down, place the drawers on top of the plywood backing and line them up even with the top. Mark where the division is between the drawers on the plywood.
Step 10: Cut the herringbone face. Using the markings for the drawers, cut directly on the line. *side note* Typically, you'll want to cut next to any marked lines, but in this case it's important to cut on the line. Depending on your project, you may have more than one cut to make.

Step 11: Drill holes for the hardware. Mark on the face of the herringbone where you want your drawer pulls to go. Once you've marked, drill the holes.
Step 12: Attach the herringbone drawer faces. Replace the drawers first. Then, starting from the bottom drawer and working your way up, place the herringbone face (with the pattern facing out) against the front end of the bottom drawer. Use playing cards to create even spacing around the edges for a proper fit. Once it's positioned, use the hardware holes to secure the face to the drawer with two temporary screws. Pull the drawer out slightly, and permanently attach the face with screws from inside the drawer. Then you may remove the temporary screws from the front. Repeat this process for each drawer.

Step 13: Stain and finish. Apply desired stain and/or finish following the directions on your stain/finish. We chose to finish the nightstand with boiled linseed oil only.

Step 14: Attach the hardware. Using the holes for the hardware, drill the rest of the way through the drawer and attach the pulls.


Voila! Now you have a beautiful, upcycled piece of furniture that has new life.
p.s. You may notice that our nightstand has a divider between the drawers. Because of the age of the nightstand, the drawer slides had gotten so worn out that they sagged a bit. We cut a thin divider to fill the gap and split the difference between the drawers.
This project was quick and straight forward. It only took a few hours from start to finish! We couldn't be happier with the final look.
-K So what do you think? Interested in upcycling an old piece of furniture? Let us know!👇


Comments