Floating Book Shelves #FBF
- Karly and JP

- Aug 7, 2020
- 3 min read
I don't know about you, but our kids have a lot of books. So many books, in fact, that when we were moving our toddler to his new room last summer before our daughter was born, we had to find more storage space for all of his books. Even though his new room is the biggest room in the house - it's technically the master, but there's no en suite and our room has doors going out to the back deck, so it wasn't exactly an option for a small child - we didn't want to clutter his space with furniture. If there's one thing I've discovered as a parent, it's that purging items you don't use or need is a form of therapy and a cluttered house makes me anxious. So adding another piece of furniture to hoard books wasn't an interest of mine. Around the same time that JP upcycled the nightstand, we decided to build floating book shelves. Our son loves to read (or, really, look at books since he's still only a toddler), so we really wanted to create an accessible place for him to grab a book and hang out if he wanted. Here's what we came up with.

Tools
- Table saw
- Miter saw. You could do this project with just a circular saw though.
- Drill
- Stud finder
- Level
- 18 Gauge Brad Nailer
- Tape measure
Materials
- 1 1”x10”8’
- Wood glue
- 1 ¼” brad nails
- 2 ½” drywall screws
- Stain/finish
- 1x2s, 1x3s, and 1x4s boards. We used reclaimed lumber but a single 1x10 would be enough for two shelves.
Step 1: Plan. Decide on how long and deep you’d like the shelves to be to fit your needs. We wanted the shelves to be about 3 inches deep and about 40 inches long.
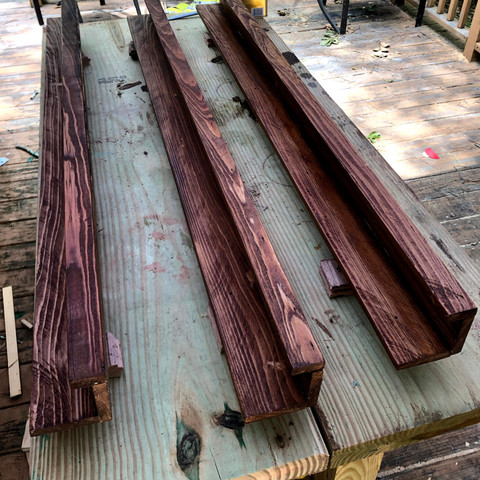
Step 2: Rip your boards. Rip your boards to width. There were three different measurements for the three parts to this shelf (back, bottom, front). For ours, the front cap measured 1 ½” wide, bottom strip at 3 ¼”, and the back panel at 4”.
Step 3: Cut your boards. Now that all the pieces are ripped to the correct width, cut each board to the final length of your shelf. For us, we cut these pieces to 40” in length. You can find more info on ripping vs cutting here.
Step 4: Assemble. Assemble the three pieces of the shelf. Using glue and brad nails, connect the 4” back panel to the 3 ¼” bottom strip, then the 1 ½ front cap to front of the bottom strip. We used simple butt joints (literally just butting the pieces up against each other) for both connections and they’ve held up great.
Step 5: Finish. Use a stain and/or finish of your choice to give a complete look and offer some protection. We used Minwax’s Early American stain and some boiled linseed oil.


Step 6: Install and enjoy! This step was super simple. We used blue tape to mark the location of studs then held the shelf up on the wall to get an idea of exactly where we’d want them. Once in position, we marked on the back panel any corresponding studs. We pre-drilled these marks and drove the screws halfway into the back panel. Put the level on the shelf, reposition the screws back over the studs, and (once level) drive the screws into the wall. The dark drywall screws are practically invisible with the wood grain and you’ll be putting books in front so they’ll be totally hidden. Voila!

We ended up only using two of the three book shelves we made for this because we didn't want to overwhelm the small area. The third book shelf ended up being repurposed for the picture frame you see above his bed! This could easily be done in a few short hours (which is mostly drying time for glue and the stain/finish). Our son has gotten so much use out of these shelves. We've found that rotating the books helps keep his interest, too. Win-win! -K
What ways do you store your kids' books? Let us know!👇


Comments